

The seven common mistakes are the wrong adhesive, untaped joints, relying on grout for waterproofing, missing fixings on stud walls, no movement gap at the perimeter, an unsound substrate and heating cables that are not fully embedded. XPS tile backer board is one of the most forgiving substrates in wet-room construction — light to handle, quick to cut, waterproof to the core. But forgiving is not the same as foolproof. Almost every failed backer board installation we are asked to diagnose traces back to one of the same seven errors, and every one of them is avoidable with a few minutes of care.
Here are the seven mistakes, why each one causes failures, and the fix for each — whether you are a DIYer boarding a first bathroom or a contractor training a crew. For the full step-by-step method, see our installation guide and the official installation documents.
1. Using the Wrong Adhesive
The mistake. Bonding boards or tiles with a solvent-based adhesive, contact adhesive or general-purpose construction glue that was never formulated for polystyrene.
Why it fails. Solvent-based products chemically attack XPS foam — the solvents dissolve the polystyrene core at the bond line, eating cavities into the board and destroying the very surface the adhesive was supposed to grip. The failure is hidden behind the tile and appears months later as loose, hollow-sounding tiling.
The fix. Choose the adhesive for bedding the boards to suit the substrate or structure, and make sure it is compatible with polystyrene. Tiles are fixed with cement-based flexible tile adhesive. Cement adhesives are chemically inert to polystyrene and bond strongly to the board's cementitious facing. If a product's suitability is unclear, check it is declared safe for polystyrene before it touches the board.
2. Not Taping and Sealing the Board Joints
The mistake. Treating a waterproof board as a waterproof wall — fixing the boards and tiling straight over them with the joints left bare.
Why it fails. The board body is waterproof; the assembly is only as waterproof as its weakest line. Every joint between boards, every internal corner and every screw penetration is a pathway for water into the wall or floor behind. In a shower, unsealed joints turn a watertight board system into a leaking one within its first season of use.
The fix. Tape every board joint and corner with the system's alkali-resistant joint tape bedded in adhesive or sealant, and seal fixing points and pipe penetrations. The tapes, corner seals and sealants are part of the system — you will find them in the accessories range.
3. Relying on Grout for Waterproofing
The mistake. Assuming that once the tiles are grouted, the wall is sealed — and skipping the waterproofing details behind the tiles as a result.
Why it fails. Cement grout is water-resistant, not waterproof. It absorbs moisture, it develops hairline cracks as the building moves, and it lets water vapour through even when intact. Waterproofing that depends on grout is waterproofing that fails on schedule.
The fix. Treat the tiled surface as the decorative layer and the build-up behind it as the waterproofing layer. If that build-up is watertight (waterproof core, taped joints, sealed penetrations and, in most showers, a membrane over the boards), grout can do its actual job, which is finishing the tile field, not keeping the water out.
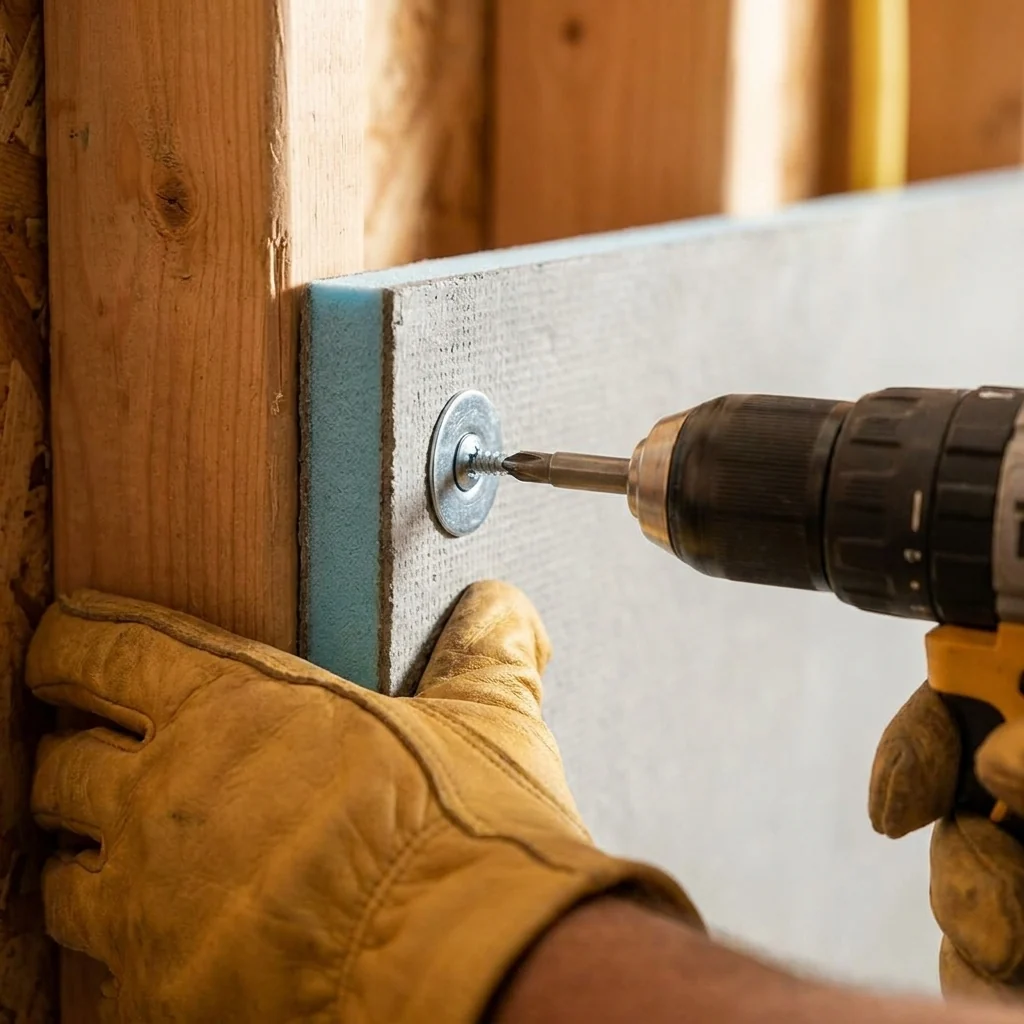
4. Skipping Mechanical Fixings on Stud Walls
The mistake. Bonding boards to stud framing with adhesive alone, or scattering a handful of screws where a proper fixing pattern belongs.
Why it fails. On framed walls the board spans between studs, and the tiled assembly carries real weight. Without a full mechanical fixing pattern, the wall flexes, joints open, tape debonds and grout lines crack — the classic symptoms of a springy substrate.
The fix. Fix boards with screws and pressure washers at 300 mm centres across the board field, tightening to 150 mm centres at edges and joints, with washers seated flush to the board face — not over-driven into it. Adhesive can supplement the screws; it does not replace them. This is the fixing pattern in the official Insutile® installation guides.
5. No Movement Allowance at the Perimeter
The mistake. Butting boards and tiles hard against walls, floors, trays and fixed fittings with no gap anywhere in the assembly.
Why it fails. Buildings move. Substrates expand and contract with temperature and humidity — more so over underfloor heating — and a tiled field with nowhere to move relieves the stress by cracking tiles, popping grout or shearing the bond line.
The fix. Leave a small perimeter gap where boards meet adjoining construction and fill it with flexible sealant rather than rigid adhesive or grout. Carry the same logic into the tile layer: flexible joints at the perimeter and at junctions between planes, exactly as tiling practice requires.
6. Tiling Over an Unsound Substrate
The mistake. Using the board to bridge over a substrate that is loose, badly out of level, or too weak to carry the finished assembly — hoping the board will fix what preparation should have.
Why it fails. A backer board regularises a surface; it does not perform structural rescue. Board over crumbling plaster, loose tiles or a bouncy, under-supported floor simply moves with the failure underneath it, and the tile field above records every millimetre of that movement.
The fix. Before boarding, confirm the substrate is sound, load-bearing and flat — level within about 3 mm, per the Build Board installation guidance. Remove loose material, secure flexing boards or battens, and correct significant unevenness first. Ten minutes of substrate testing prevents the one failure the board itself cannot.
7. Not Fully Embedding Underfloor Heating Cables
The mistake. Tiling directly over heating cables or mats with air pockets and voids left around the element instead of encapsulating it completely in adhesive.
Why it fails. Air is an insulator. A cable surrounded by a void cannot shed its heat into the floor, so it runs hotter than its design temperature — shortening its life and, in the worst case, burning out. Voids also weaken the tile bed above, producing hollow spots and cracked tiles along the cable runs.
The fix. Embed cables and mats fully in flexible cement-based tile adhesive or a suitable levelling compound before or during tiling, working the material around the element so no air pockets remain. Then commission the heating gradually, following the heating manufacturer's first-heat schedule.
The Pre-Tiling Checklist
Thirty seconds before the first tile goes on, confirm:
- Substrate sound, load-bearing and flat before boarding
- Boards fixed with screws and washers — 300 mm centres in the field, 150 mm at edges and joints
- Every joint, corner and penetration taped and sealed
- Perimeter gaps left and filled with flexible sealant
- Only polystyrene-compatible adhesives, chosen to suit the substrate
- Heating cables fully embedded with no voids
- Waterproofing complete behind the tiles — grout is not part of the plan
Seven lines, and virtually every common backer board failure is designed out before it can start.
Frequently Asked Questions
What adhesive should I use with XPS tile backer board?
The adhesive for bedding the boards depends on the substrate or structure they are fixed to, and it must be compatible with polystyrene. Tiles are fixed with cement-based flexible tile adhesive. Never use solvent-based adhesives or general-purpose construction glues — solvents attack the polystyrene core and destroy the bond from inside.
If the board is waterproof, why do the joints need tape?
Because water finds lines, not surfaces. The board body is impervious, but joints, corners and screw penetrations are pathways unless they are sealed. Taping and sealing closes those pathways. In showers, a waterproofing membrane is then applied over the boards and joints in most cases.
How many screws does a backer board need on a stud wall?
Follow the pattern in the Insutile® installation guides: screws with pressure washers at 300 mm centres across the field of the board and 150 mm centres at edges and joints, seated flush with the board face.
Installing Insutile® boards on a current project? Download the step-by-step guides on the installation page, complete the system from the accessories range, or ask our technical team to review your build-up before you tile.